How to Wire Bathroom Fan And Light on Separate Switches? Step-by-Step Guide
How to wire bathroom fan and light on separate switches? To wire a bathroom fan and light on separate switches, run power to the switch box, then connect two switches: one for the fan and one for the light. Run separate wires from each switch to the fan and light. Ensure proper grounding and follow local electrical codes.
Not only does this upgrade offer convenience, but it also enhances the functionality and style of your bathroom. Whether you’re aiming for a relaxing bath or a quick shower, having individual control over your fan and light can make all the difference.
You’ll discover how simple it is to wire your bathroom fan and light on separate switches. You’ll learn practical steps that can be done even if you’re not a seasoned electrician. Say goodbye to fumbling with one switch that does it all, and say hello to personalized comfort and efficiency. Intrigued? Let’s get started on transforming your bathroom into a space that caters to your needs perfectly.
Credit: www.youtube.com
How to Wire Bathroom Fan And Light on Separate Switches?
Tools And Materials Needed
Gather wire strippers, screwdrivers, and a voltage tester. Have electrical wire, a double switch, and wire nuts ready. Ensure safety gear, like gloves and goggles, is available.
Wiring a bathroom fan and light on separate switches can seem daunting, but with the right tools and materials, it’s a manageable DIY project that can significantly enhance your bathroom’s functionality. Imagine the convenience of operating the fan independently from the light, especially during those early morning showers when you don’t want to wake the entire household. Before you start, ensure you have everything you need to avoid unnecessary trips to the hardware store.
Essential Tools
Having the right tools is crucial. A screwdriver set is a must; it’s needed for removing and securing switch plates and fixtures. Ensure you have both flathead and Phillips screwdrivers, as different fixtures might require different types. Wire strippers are essential for exposing the copper wire for connection. They make clean cuts and prevent damage to the wire, which is critical for a secure connection. A voltage tester is not just handy; it’s a safety must-have. Use it to confirm that power is off before you start working. This simple step can prevent accidents and ensure your safety.
Necessary Materials
You’ll need a double switch to operate the fan and light separately. Make sure it’s compatible with your current setup and fits the electrical box. Electrical wire is another key material. You typically need 14-gauge wire for a bathroom circuit, but check your local code to be sure. It’s better to have a bit more than you need than to come up short. Wire nuts are small, inexpensive, and crucial for connecting wires safely. They ensure that the wires are securely joined and insulated from each other.
Additional Supplies
Consider using electrical tape to secure wire nuts and cover any exposed wires. It adds an extra layer of safety and can prevent accidental shorts. Mounting screws may be needed if the existing ones are worn or if you’re installing new switch boxes. Having a few extras can save you a lot of frustration. You might wonder, is it really necessary to have all these tools and materials ready? The answer is yes. Being prepared not only saves time but also reduces stress during the project. Plus, having everything at hand allows you to focus on the task, ensuring a successful and safe installation. So, are you ready to take on this project and enjoy the convenience of separate switches?

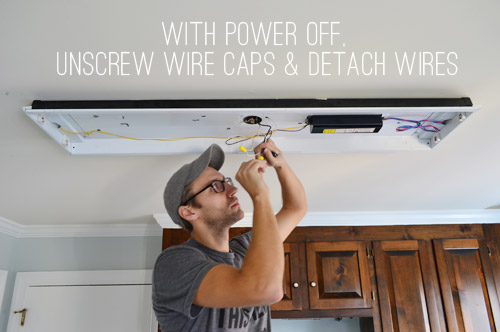
Credit: diy.stackexchange.com
Preparing The Circuit
Setting up a bathroom fan and light on separate switches requires careful attention to wiring. Begin by turning off the power at the circuit breaker. Connect the wires from each switch to the fan and light, ensuring secure and correct connections.
Preparing the circuit is an essential step when wiring a bathroom fan and light on separate switches. This process ensures that you have a safe and efficient setup, allowing you to control the fan and light independently. It’s a task that requires a bit of planning but is achievable even for DIY enthusiasts. Have you ever flipped on the bathroom light only to realize you also triggered the loud fan? Wiring them separately can offer a quieter, more controlled experience.
Understanding Your Wiring Setup
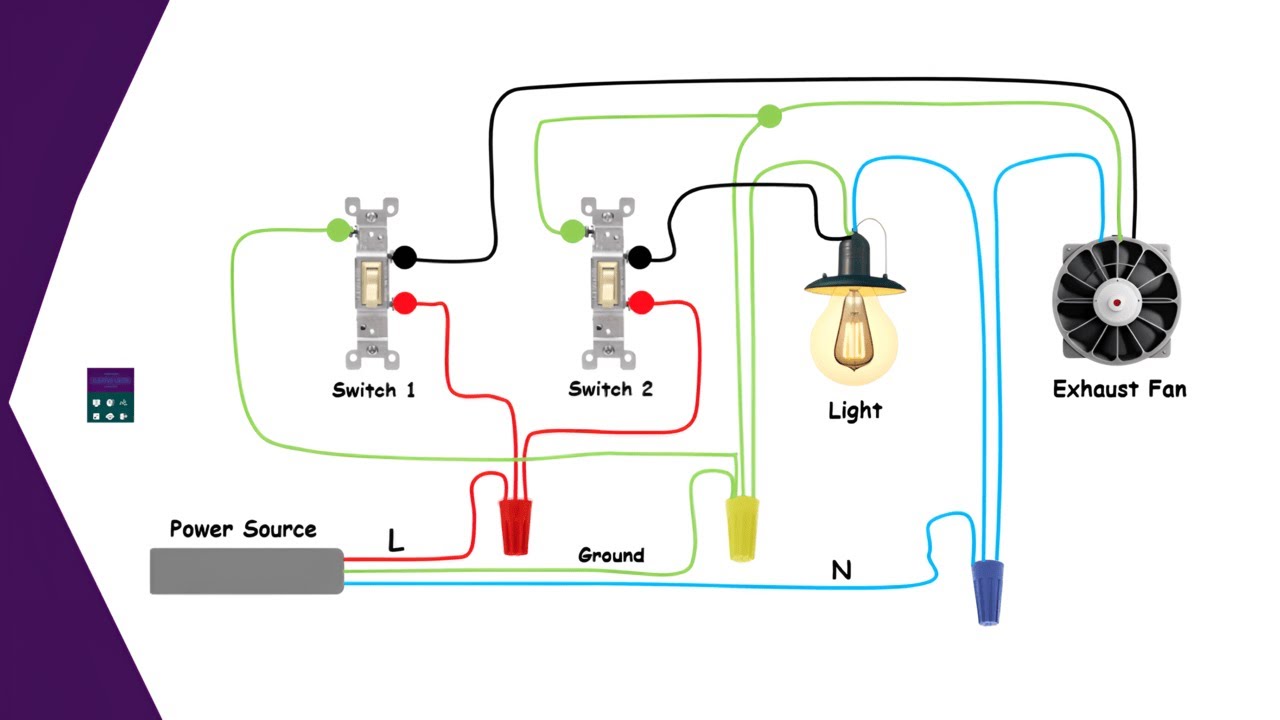
First, take a look at your existing wiring setup. You’ll need to identify the wires that supply power to your bathroom. Typically, you’ll find black wires (hot), white wires (neutral), and green or bare wires (ground). Each wire has a distinct function, and understanding these will help you manage the changes effectively.
Gathering Necessary Tools And Materials
Make sure you have all necessary tools and materials before you start. You will need a screwdriver, wire nuts, electrical tape, and a voltage tester. Additionally, having a clear wiring diagram can make the task easier. It’s like having a roadmap to guide you to your destination.
Turning Off The Power
Safety first! Always ensure the power is turned off at the circuit breaker before you begin. Use a voltage tester to double-check that the wires are not live. This step is crucial to avoid any electrical mishaps. Have you ever experienced the panic of realizing you forgot to turn off the power? It’s a mistake you only make once!
Planning The Circuit Path
Plan the path for your new wiring. Consider where you want the switches to be located. This planning phase allows you to visualize the end result and adjust your approach if necessary. It’s similar to arranging furniture in a room—placement matters for ease of use.
Running The Wires
Once you’ve planned the path, run the wires accordingly. Ensure each wire is correctly connected to its respective switch. This setup will allow you to control the fan and light separately, giving you the flexibility to use one without the other. By preparing your circuit thoughtfully, you set the stage for a successful wiring project. Are you ready to enjoy a more tailored bathroom experience with separate controls for your fan and light?
Wiring The Bathroom Fan
Proper wiring of a bathroom fan ensures efficiency. It also enhances safety. A separate switch for the fan offers flexibility. This setup allows independent control of the fan and light. Begin by gathering necessary tools and materials.
Identify The Power Source
Locate the circuit breaker for the bathroom. Turn it off to ensure safety. Test the wires with a voltage tester. Confirm there’s no power before proceeding. Safety first, always.
Prepare The Wiring
Strip the insulation from the wires. Use a wire stripper for this task. Ensure about half an inch of bare wire. This helps in making secure connections. Prepare the fan’s wires in the same way.
Connect The Wires
Connect the fan’s black wire to the switch’s black wire. Twist them together using a wire nut. Ensure the connection is tight and secure. Connect the white neutral wires together. Finally, connect the ground wires.
Secure The Connections
Double-check all wire connections. Secure them properly with wire nuts. Ensure there are no loose ends. Use electrical tape for added security. Neat connections prevent future problems.
Test The Setup
Switch the circuit breaker back on. Test the bathroom fan switch. Ensure it operates independently from the light. This confirms proper wiring. If issues arise, recheck connections.
Connecting The Light Fixture
Learn to wire a bathroom fan and light on separate switches with ease. Follow simple steps for a functional setup. Enhance your bathroom’s convenience by managing fan and light independently.
Connecting the light fixture in your bathroom can seem daunting, but it’s a manageable task with the right guidance. Have you ever found yourself in the middle of a project, wishing for a step-by-step guide that doesn’t require a degree in electrical engineering? You’re in luck! Today, we’ll break down how to wire your bathroom fan and light on separate switches, specifically focusing on connecting the light fixture.
Understanding Your Light Fixture
Before diving into the wiring process, ensure you understand the components of your light fixture. Check if it supports separate switch wiring. Most modern fixtures are designed for easy installation, but it’s always good to double-check.
Gathering Your Tools And Materials
Have you ever started a project only to realize you’re missing tools halfway through? Avoid this by gathering everything you need upfront. You’ll need a screwdriver, wire strippers, electrical tape, and a voltage tester.
Turning Off The Power
Safety first! Always ensure the power to your bathroom is off before starting any electrical work. Use a voltage tester to confirm there’s no electricity running through the wires. This step can’t be emphasized enough.
Connecting The Wires
Now, let’s get to the heart of the task. Connect the black wire from your light fixture to the black wire from the switch. This connection will control the power flow. Make sure to twist the wires together and cover them with a wire nut.
Securing The Neutral And Ground Wires
Next, connect the white neutral wire from the light fixture to the white wire from the power source. This step ensures the circuit is complete. Don’t forget to secure the ground wire (usually green or bare) to the grounding screw or wire.
Testing The Connection
Once everything is connected, it’s time to test your work. Turn the power back on and flip the switch for the light. If it lights up, congratulations! You’ve successfully wired your bathroom light on a separate switch.
Troubleshooting Common Issues
If the light doesn’t turn on, don’t panic. Double-check your connections to ensure everything is securely fastened. Look for any loose wires or incorrect connections. Wiring your bathroom fan and light on separate switches can seem like a big project, but with patience and careful attention to detail, it’s entirely doable. Have you ever tackled a DIY project and surprised yourself with the results? This could be one of those moments!
Testing And Safety Checks
Ensure safe wiring by conducting thorough testing and safety checks. Connect bathroom fan and light separately for better control. Follow instructions carefully and confirm proper functioning before using switches.
When you’ve successfully wired your bathroom fan and light to separate switches, the next crucial step is testing and conducting safety checks. Ensuring everything works as intended not only confirms your wiring skills but also keeps your home safe. This is a step often underestimated, yet it is where you can catch any errors before they become costly or dangerous problems.
Testing The Functionality
Begin by flipping the switches one at a time. Does the fan start immediately when you turn its switch? Does the light illuminate when you engage its switch? If either doesn’t operate correctly, recheck your wiring connections. It’s wise to test multiple times. Turn them on and off several times to ensure consistent functionality. If you encounter flickering or hear unusual sounds, these are signs that something might be amiss in your wiring setup.
Conducting Safety Checks
Safety comes first. Inspect the area around the switches and the fan and light fixtures for any exposed wires. Such wires pose a risk of electrical shock or fire. Cover them appropriately using wire nuts or electrical tape. Ensure that the switches are securely installed in their boxes. Loose switches can lead to accidental sparks, posing a hazard. If the switch feels loose or wobbly, tighten it to prevent potential safety issues.
Using A Voltage Tester
A voltage tester is your best friend in ensuring the wiring is safe. Use it to check that there is no unexpected voltage running through the wires when the switches are off. This step can save you from future shocks and electrical failures. A simple test with a voltage tester can reveal whether your wiring is safely grounded. If the tester lights up, it indicates a problem that needs immediate attention.
Seeking Professional Help
Feeling uncertain about your testing results? There’s no shame in calling a professional. An electrician can provide peace of mind and ensure your wiring is safe. You might have nailed the wiring, but their expertise can catch subtle errors. Have you ever thought about the consequences of skipping a safety check? It could lead to electrical fires or damage. Prioritizing safety checks after wiring can prevent these scenarios, keeping your home secure and your family safe.
Documenting Your Success
After successful tests, document your process. Take notes on the wiring setup and any issues you encountered. This record can be invaluable for future reference or when explaining your setup to others. A quick photo of your wiring can also help you remember the configuration. It can be a useful guide if you ever need to troubleshoot or make adjustments later.

Credit: www.pinterest.com
Frequently Asked Questions
How Do I Wire A Bathroom Fan And Light Separately?
To wire them separately, install two switches. Connect the fan and light to each switch. Ensure proper wiring.
What Tools Do I Need For Wiring Bathroom Switches?
You’ll need wire strippers, screwdrivers, and electrical tape. A voltage tester is also recommended for safety.
Can I Wire A Fan And Light On One Circuit?
Yes, but ensure the circuit can handle the load. Check the circuit’s amperage capacity for safety.
Conclusion
Separating your bathroom fan and light on different switches offers benefits. It enhances energy efficiency and comfort. You can control light and ventilation individually. Follow the steps carefully to ensure safety. Remember to switch off the power first. Gather the right tools and materials needed.
Seek help from a professional if unsure. This project can improve your bathroom experience. Enjoy a customized lighting and ventilation setup. You now have the knowledge to complete the task confidently. Happy wiring!
Related Article