How to Install a Bathroom Fan With Light? Step-by-Step Guide
How to install a bathroom fan with light? Turn off power. Remove the old unit. Cut ceiling hole if needed. Mount the new fan housing to a joist. Connect duct, wiring (match black, white, ground), and secure light. Attach grill cover. Restore power and test both fan and light. Follow manufacturer’s instructions for specific wiring and setup.
This simple upgrade can transform your space, making it more comfortable and functional. Imagine walking into a bathroom that stays fresh and well-lit every time you use it. Plus, a fan with light can help reduce moisture, preventing mold and mildew.
You’re probably thinking, “Can I really do this myself? ” The good news is, you can! With the right guidance, installing a bathroom fan with light can be a straightforward DIY project. Dive into this article to discover easy steps and tips to get the job done efficiently. Your brighter, fresher bathroom is just a few steps away.
How to Install a Bathroom Fan With Light?
Choosing The Right Fan And Light Combo
Choosing the right fan and light combo is crucial. It affects both function and style in your bathroom. A well-chosen unit can improve ventilation and lighting. It can also enhance the overall aesthetic of the space.
Consider The Size Of Your Bathroom
The size of your bathroom plays a key role. A larger bathroom requires a stronger fan. The fan’s power is measured in CFM, or cubic feet per minute. For small bathrooms, 50 CFM may suffice. Large bathrooms might need 100 CFM or more.
Look For Energy Efficiency
Energy-efficient fans save money. They also reduce your carbon footprint. Look for fans with an Energy Star rating. These models use less power and operate quietly. Quiet fans make your bathroom experience more pleasant.
Choose The Right Light Type
Different light types serve various needs. LED lights are energy-efficient and long-lasting. They provide bright and clear illumination. Halogen lights offer warm and natural lighting. Consider your bathroom’s lighting needs before choosing.
Check The Noise Level
Noise level matters in a bathroom fan. A noisy fan can be disruptive. Fans are rated by sones. A lower sone rating means a quieter fan. Aim for a fan with a rating of 1.5 sones or less.
Assess The Design And Style
The fan and light combo should match your bathroom decor. Consider the design and finish. Chrome or white finishes are popular choices. Ensure the unit complements your bathroom’s style.
Gathering Necessary Tools And Materials
Start by collecting essential tools like a screwdriver, wire stripper, and a drill. Gather materials such as the bathroom fan with light, screws, and wire connectors. Having everything ready will make the installation process smoother and faster.
Installing a bathroom fan with light might seem daunting, but with the right tools and materials, it’s a project you can confidently tackle. Preparation is key to success. Having everything you need at your fingertips not only saves time but also keeps frustration at bay. Equipped with the right tools, you can focus on getting the job done smoothly. Let’s dive into what you need to gather before starting this project.
Tools You Will Need
A good toolkit is your best friend during this installation. Make sure you have a drill and a screwdriver at hand. These will be essential for both removing your old fan and securing the new one in place. Don’t forget a wire stripper. This tool is crucial for preparing electrical wires during installation. A measuring tape and a pencil will help you mark precise spots for cutting and drilling. You’ll also need a utility knife. It’s perfect for cutting drywall if you need to enlarge the opening for your new fan. Keep a step ladder nearby, as you’ll be working close to the ceiling.
Materials To Gather
Apart from tools, certain materials are needed to complete the job. Start with a bathroom fan with light. Ensure it’s the right size and model for your space. Have some vent ducting ready. This will connect your fan to the outside, ensuring proper ventilation. You’ll also need wire connectors to safely join electrical wires. Pick up some caulk or sealant. This will help seal any gaps around the fan, preventing moisture from seeping into your ceiling. Lastly, get some screws that match the specifications of your fan.
Safety Gear
Safety should never be overlooked. Wear safety goggles to protect your eyes from dust and debris. A dust mask is also a good idea, especially when dealing with older ceilings that may release particles. Gloves can protect your hands from sharp edges and electrical wires. And always ensure your step ladder is stable and secure before you climb.
Organizing Your Workspace
A cluttered workspace can lead to mistakes. Lay out all your tools and materials before you begin. This way, you won’t be scrambling to find a screwdriver halfway through. Consider placing a drop cloth on the floor. It catches dust and debris, making cleanup easier once you’re done.
Checking Your Fan’s Specifications
Every bathroom fan is a bit different. Read through the instruction manual that comes with your new fan. This will ensure you have all the specific materials and tools it requires. Does your fan model need special brackets or mounting hardware? Understanding these details before you start will streamline your installation process.
Are You Ready?
As you gather your tools and materials, think about the end result. A well-ventilated bathroom with a bright new light is just a few steps away. Are you ready to transform your space? Remember, preparation is half the battle. With everything in place, you’re set to install your bathroom fan with light confidently.
Preparing The Installation Area
Clear the area where the fan will be installed. Remove any obstacles or items. Ensure the ceiling is accessible for a smooth installation process.
Installing a bathroom fan with a light can be a game-changer for your home. It enhances ventilation and illumination simultaneously, making it a practical upgrade. But before you dive into the installation process, it’s crucial to prepare the installation area properly. Taking the time to set up your workspace will not only make the installation smoother but also ensure safety and efficiency.
Clear The Space
First, you need to clear the area where the fan will be installed. Make sure there are no obstacles in the bathroom that might hinder your movement. Remove any items on the floor or nearby shelves to avoid accidental damage. Think about how clutter-free the area needs to be. It’s easier to work when you have ample space to move tools and materials around without tripping over something.
Gather Your Tools And Materials
Having the right tools on hand can make the installation process much easier. You will need a drill, screwdriver, wire stripper, and a utility knife. Also, gather the materials like electrical tape, wire connectors, and the new fan with light kit. Imagine being halfway through your installation and realizing you’re missing a crucial tool. That can be frustrating, right? So, double-check your toolbox before starting.
Check The Power Supply
Before you begin, ensure that the power to the bathroom is turned off at the circuit breaker. Safety should always be your top priority. Use a voltage tester to confirm that there is no electrical current running through the existing wiring. Have you ever had that moment of doubt, wondering if the power is really off? A quick check with a voltage tester can give you peace of mind.
Measure The Ceiling Space
Accurate measurements are essential. Measure the space where the fan will be installed to ensure it fits perfectly. Check the manufacturer’s instructions for specific measurements and clearance requirements. It’s a bit like fitting a puzzle piece; if it’s too big or too small, it just won’t work. Make sure your fan fits snugly into the designated area.
Consider Ventilation Path
Plan the path for the ventilation duct. The fan must vent to the outside to prevent moisture buildup in your attic or ceiling. Identify the shortest and most direct route to an exterior wall or roof. Think about how moisture can damage your home if not properly ventilated. Ensuring a clear path for air to escape is crucial for the fan’s effectiveness.
Inspect The Attic
If your fan installation requires attic access, inspect the attic space. Ensure it’s clear of insulation or debris that might interfere with the installation. Check for any structural issues that might complicate the process. Imagine discovering a hidden problem in the attic right in the middle of your project. A quick inspection can save you from unexpected surprises. By preparing your installation area carefully, you set yourself up for success. Remember, a well-prepped workspace leads to a smoother, more efficient installation process. Are you ready to transform your bathroom with a new fan and light?
Installing The Fan And Light Unit
Installing a bathroom fan with light enhances functionality and ambiance. Begin by gathering necessary tools and ensuring safety. Follow instructions to mount the unit securely, ensuring proper wiring for optimal performance.
Installing a bathroom fan with a light enhances ventilation and lighting. It’s a practical upgrade for any bathroom. This section guides you through the process. Follow these steps for a successful installation.
Tools You Will Need
Gather your tools before starting the installation. You need a screwdriver, wire stripper, and voltage tester. A drill and saw might be necessary too. Ensure you have safety glasses and gloves.
Turn Off The Power
Safety is crucial. Turn off the power at the circuit breaker. Use a voltage tester to confirm no electricity flows. This prevents accidents while working.
Prepare The Installation Area
Locate the area for your fan and light. Mark the spot on your ceiling. Use a saw to cut an opening. Ensure the size matches the fan unit.
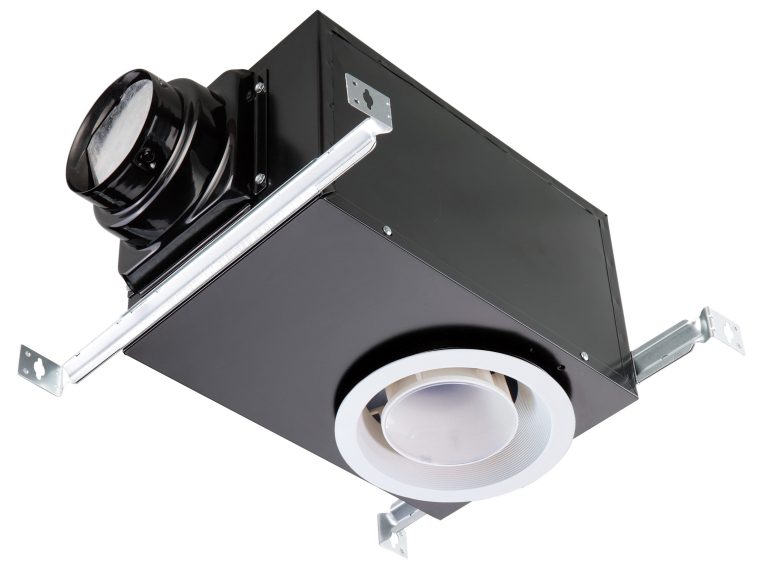
Install The Fan Housing
Place the fan housing into the ceiling hole. Secure it with screws. Ensure it is stable and fits snugly.
Connect The Wiring
Match the wires from the fan to your home’s wiring. Connect ground, neutral, and hot wires. Use wire connectors for secure connections.
Secure The Fan And Light Unit
Attach the fan and light unit to the housing. Follow the manufacturer’s instructions. Ensure it clicks into place securely.
Test The Unit
Turn the power back on at the breaker. Test the fan and light. Ensure both operate smoothly. Adjust any loose parts if needed. This process ensures your bathroom fan with light is properly installed. Enjoy improved ventilation and lighting.
Testing And Final Adjustments
After installing a bathroom fan with light, testing and adjustments are crucial. This ensures the fan functions properly and safely. Proper testing helps identify any issues or mistakes.
Testing The Electrical Connections
Double-check the wiring connections before turning on the power. Ensure all wires are securely fastened. Loose wires can be dangerous and cause malfunction. Use a voltage tester to confirm power is reaching the fan.
Checking Fan Operation
Turn on the switch to test the fan. Listen for unusual noises or vibrations. A quiet hum is normal, but loud sounds may indicate a problem. Feel for airflow to ensure the fan is working effectively.
Testing The Light
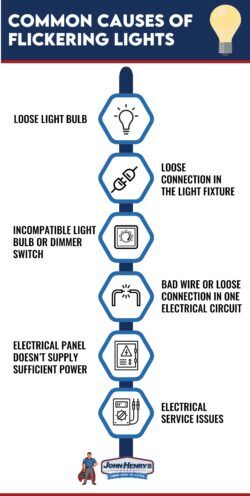
Switch on the light to verify its operation. Check for flickering or dimness. A steady, bright light indicates proper installation. Replace the bulb if necessary for optimal lighting.
Adjusting Fan Settings
Adjust the fan speed, if possible, to suit your preference. Ensure the settings provide adequate ventilation. Experiment with different settings to find the best balance.
Inspecting Safety Features
Ensure the fan cover is securely attached. Check for any exposed wires or parts. Proper installation prevents accidents and ensures safety. Review the manufacturer’s instructions for additional safety tips.
Final Clean-up
Remove any installation debris from the bathroom. Ensure the fan area is clean and free of obstructions. A clean setup promotes efficient operation and longevity.
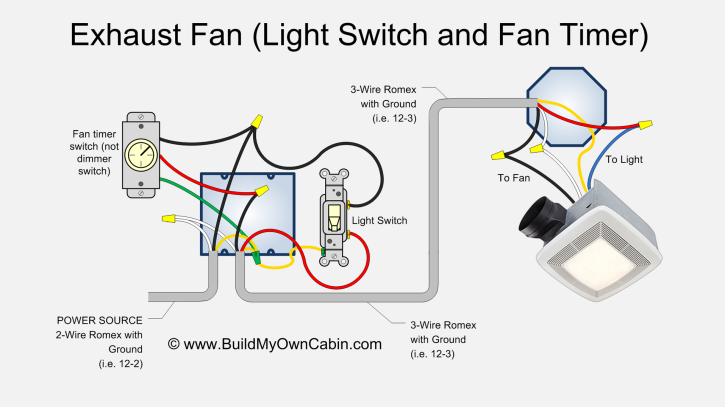
Credit: www.buildmyowncabin.com
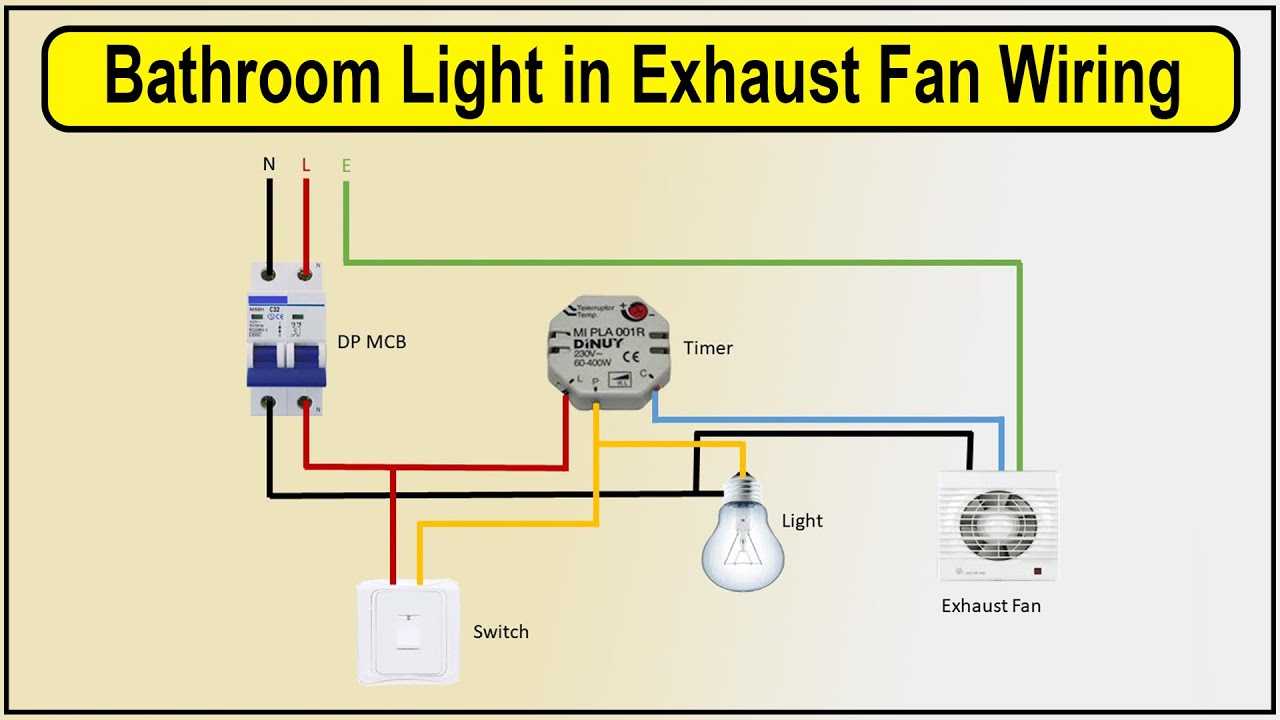
Credit: www.youtube.com
Frequently Asked Questions
What Tools Do I Need To Install A Bathroom Fan With Light?
You need a screwdriver, wire cutter, and electrical tape. A drill and a ladder are also helpful.
How Do I Ensure The Fan Is Vented Properly?
Make sure the fan vents outside the house. Use a duct to connect the fan to an exterior vent.
Can I Install A Bathroom Fan With Light By Myself?
Yes, you can. Follow the instructions carefully. Ensure safety by turning off electricity before starting.
Conclusion
Installing a bathroom fan with light can be straightforward. Follow the steps carefully. Start by gathering all your tools and materials. Ensure safety first by turning off the electricity. Next, remove the old fan if needed. Measure and cut the ceiling hole for the new fan.
Secure the fan unit and connect the wiring. Attach the light fixture and cover. Finally, test the fan and light to ensure they work. With these steps, your bathroom will be brighter and more ventilated. Enjoy your new setup, knowing you did it yourself.
Related Article