How Do You Wire Led Lights? A Step-by-Step Guide
How do you wire Led lights? To wire LED lights, connect the positive wire (usually red) from the power source to the LED’s positive terminal, and the negative wire (usually black) to the LED’s negative terminal. Use a compatible power supply and resistor if needed. Secure connections with wire nuts or solder and electrical tape.
Whether you’re looking to enhance your living room, set up a captivating workspace, or simply add a touch of color to your bedroom, wiring LED lights can be a game-changer. You don’t need to be an electrician to master this skill; just a few simple steps and you’ll be ready to illuminate your surroundings.
Dive in to discover how you can wire LED lights with ease and style, making your home a place that truly reflects your personality.
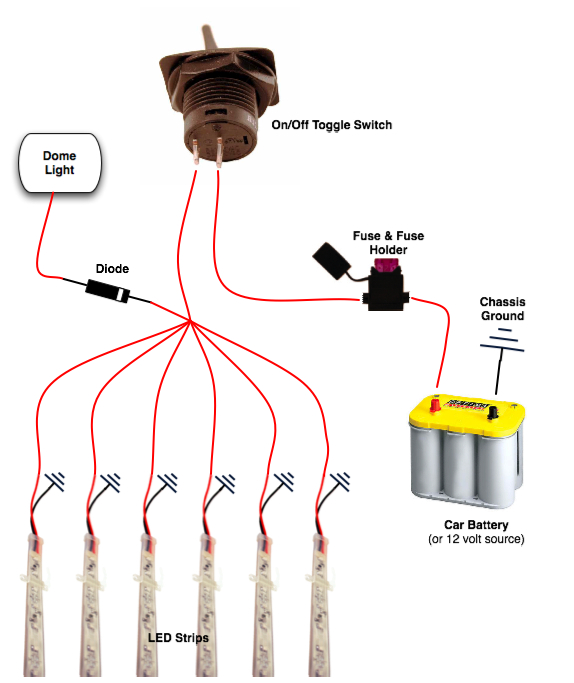
Credit: www.oznium.com
How Do You Wire Led Lights?
Gathering Necessary Tools
To wire LED lights, gather essential tools like wire cutters, pliers, and a voltage tester. Ensure you have electrical tape and connectors for secure connections. A clear understanding of the setup is crucial for a successful installation.
Before diving into the world of LED light installation, the first crucial step is gathering the necessary tools. This step can make or break your project. Having the right tools on hand ensures a smooth process, reduces stress, and saves time. Imagine starting your project only to realize you’re missing a critical tool. Frustrating, right? Let’s avoid that scenario by preparing properly.
Understanding The Tools You Need
You might be wondering, what exactly do you need to get started? The answer depends on the complexity of your project. For basic LED strip lighting, you’ll need a few essential tools. A pair of wire cutters and strippers, a soldering iron, and electrical tape are must-haves. These tools help you handle wires with precision and safety.
Why Wire Cutters And Strippers Are Essential
Wire cutters are your go-to for trimming wires to the desired length. Wire strippers, on the other hand, help you remove the insulation from the wires without damaging them. Both are crucial for preparing the wires to connect to your LED lights. Imagine trying to strip wires with a kitchen knife—messy and inefficient. Using the right tools makes your work cleaner and more professional.
The Role Of A Soldering Iron In Led Wiring
For those planning a more permanent setup, a soldering iron is invaluable. It allows you to make secure connections between wires and LED strips. Soldering might sound intimidating, but with a bit of practice, it becomes straightforward. Plus, it ensures that your connections are strong and reliable, preventing future issues.
Don’t Forget Electrical Tape
Electrical tape might seem like a minor component, but it’s vital for safety. It insulates exposed wires, preventing short circuits or electrical shocks. Always have a roll handy in your toolbox. It’s an inexpensive way to ensure your project is safe and tidy.
Are There Any Additional Tools?
Depending on your specific project, you might need additional tools. A multimeter is useful for checking electrical connections. Heat shrink tubing can provide extra insulation and protection. Think about the scope of your project and gather any extra tools you might need. Before you start, take a moment to double-check your toolbox. Is everything you need there? Being prepared not only boosts your confidence but also ensures your LED wiring project is a success.
Choosing The Right Led Lights
Wiring LED lights involves connecting wires to a power source, ensuring proper polarity. Secure connections prevent flickering. Always follow manufacturer instructions for safe installation.
Choosing the right LED lights is crucial for achieving the desired ambiance and efficiency in your space. Whether you’re looking to brighten up your living room or add a touch of color to your workspace, selecting the right LED lights can make all the difference. Let’s dive into the essentials of picking LED lights that best suit your needs.
Understanding Led Types
LED lights come in various forms, including strip lights, bulbs, and panel lights. Each type serves a unique purpose. Strip lights are great for accent lighting along walls or under cabinets. Bulbs work well in lamps and ceiling fixtures. Panel lights are ideal for larger areas like offices. Choose the type that aligns with your intended use.
Evaluating Brightness And Color Temperature
Brightness is measured in lumens, and it’s important to match the lumens to the size and purpose of your space. A kitchen might need brighter lighting compared to a bedroom. Additionally, color temperature affects the mood of a room. Warm white (2700K-3000K) offers a cozy feel, while cool white (3500K-4100K) provides a more vibrant atmosphere. Consider what ambiance you want to create.
Considering Energy Efficiency
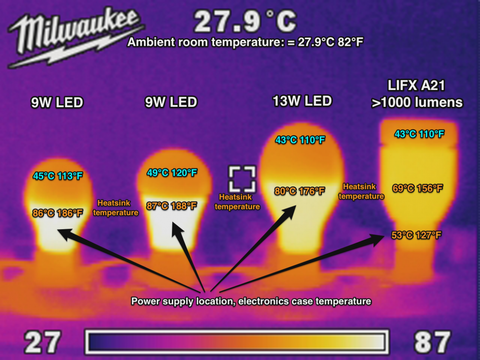
LED lights are renowned for their energy efficiency. However, not all LEDs are created equal. Check the wattage and look for Energy Star ratings to ensure you’re choosing a light that’s both bright and economical. High-quality LEDs can save money on your electricity bill and have a longer lifespan.
Checking Compatibility With Dimmer Switches
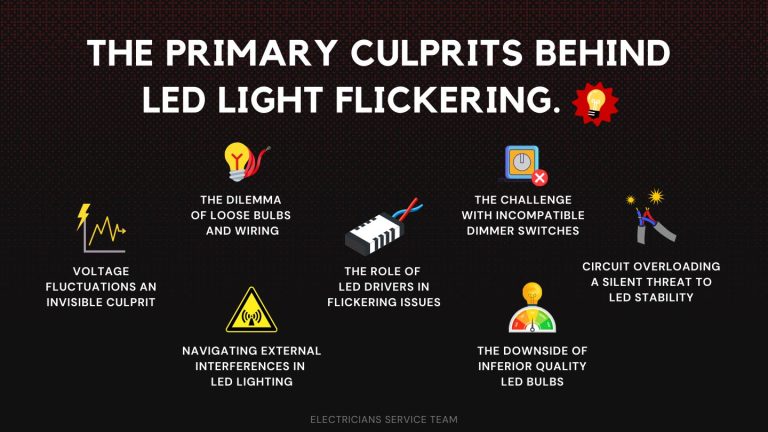
If you plan to use dimmer switches, ensure your chosen LEDs are compatible. Not all LEDs work with dimmers, and using incompatible ones can lead to flickering or reduced lifespan. Look for LED lights labeled as “dimmable” to ensure smooth operation.
Assessing Installation Requirements
Some LED lights are plug-and-play, while others might require more complex installation. Before purchasing, consider your comfort level with electrical work. If you’re not confident, you might need professional help. Always read the installation guides to avoid surprises.
Reflecting On Personal Experience
I once chose LED strip lights for my home office, aiming for a sleek look. However, I overlooked the importance of brightness, resulting in a dim workspace. It taught me to prioritize practical needs over aesthetics. What lesson will you learn from your lighting choice? Choosing the right LED lights involves more than just picking the first option you see. It’s about understanding your space and needs. How will your choice impact your daily life?
Understanding Basic Wiring Concepts
Wiring LED lights involves connecting the positive and negative wires carefully. Ensure the power source matches the LED’s voltage needs. Use connectors to join wires securely, avoiding loose ends.
Understanding the basic wiring concepts for LED lights is crucial if you want to install them in your home or car. Whether you’re replacing old bulbs or starting a new project, knowing how to wire LED lights can save you time and frustration. Imagine the satisfaction of seeing your space light up just as you envisioned, thanks to your own handiwork. Let’s dive into the essentials that will help you achieve that vision.
What Is Voltage?
Voltage is like the pressure that pushes electricity through wires. You need to match the LED lights to the correct voltage to prevent damage. Most household LEDs run on 12V or 24V systems. If you’re using a power supply, make sure it matches your LED’s voltage needs. This ensures the lights work efficiently and don’t burn out prematurely.
Understanding Current
Current is the flow of electricity. Think of it as the amount of electricity that moves through the wire. LEDs require a specific current to function properly. If you push too much current, the LED can overheat. Use the right resistor to control the current flow. This small adjustment can make a big difference in longevity.
The Role Of Resistors
Resistors are crucial in LED wiring to limit the current. Without them, LEDs can receive too much electricity and burn out. Choose a resistor based on your LED’s specifications. Use Ohm’s Law to calculate the resistance needed. It might sound complex, but it’s just a simple formula to make your wiring safer.
Series Vs Parallel Wiring
Deciding between series and parallel wiring affects how your LEDs light up. In series wiring, the current flows through each LED one after the other. It’s great for creating a uniform brightness. Parallel wiring lets each LED receive the same voltage, so if one fails, others stay lit. Choose based on your project’s needs and aesthetic goals.
Practical Tips For Wiring
Before you start wiring, lay out all your tools and components. Double-check connections as you go. It’s frustrating to find a loose wire after everything’s done. Use heat shrink tubing for neatness and safety. Remember, patience and precision go a long way in ensuring your LED project is a success. How confident are you in your wiring skills? Taking the time to understand these concepts will empower you to tackle any LED project confidently. Remember, practice makes perfect, and each project will get easier as you gain experience.
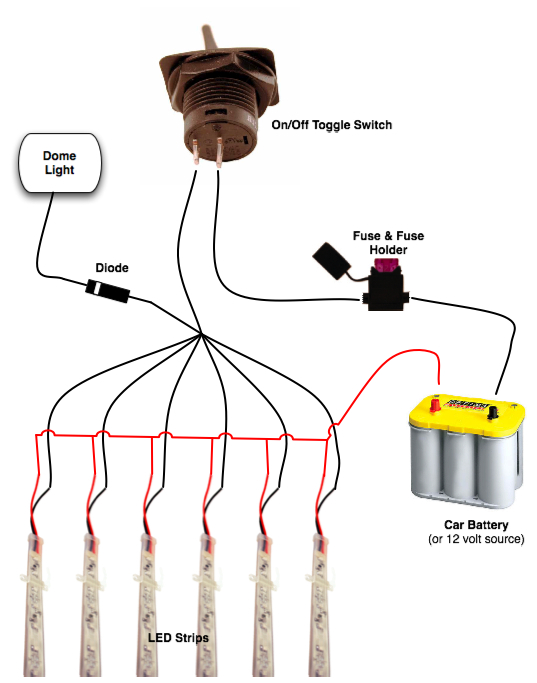
Credit: www.oznium.com
Connecting The Led Lights
Wiring LED lights involves connecting the positive and negative wires correctly. Ensure a secure connection to prevent flickering. Follow the manufacturer’s instructions for best results.
Connecting the LED Lights can seem daunting, but with a little guidance, it’s a task anyone can tackle. Installing LED lights can transform your space, adding both brightness and style. Understanding the wiring process is crucial to ensure your LEDs function properly and safely.
Understanding Your Led Light Kit
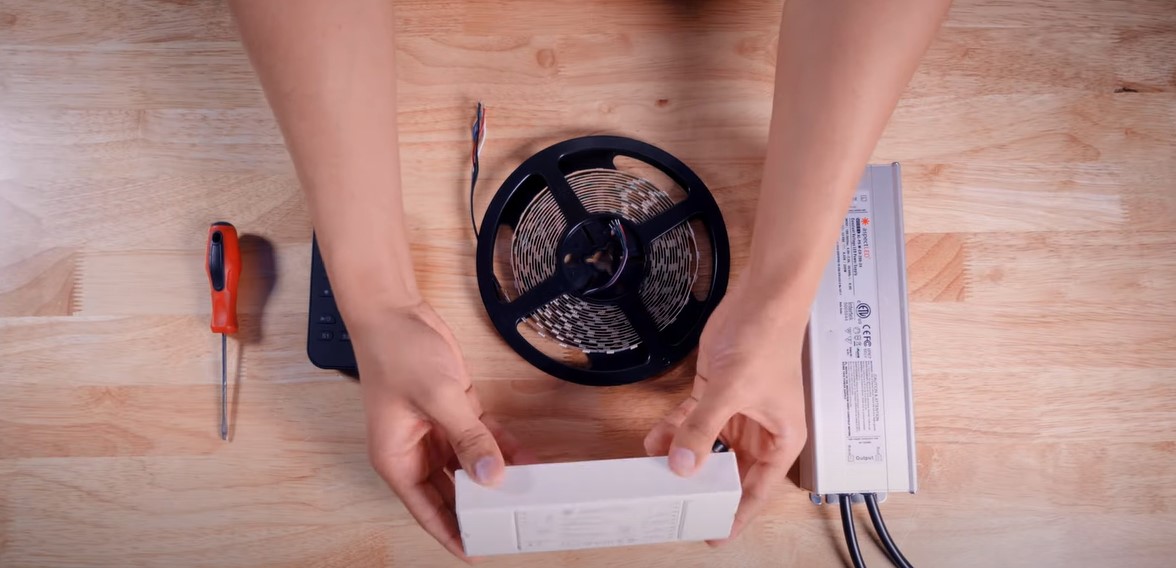
Before you start, check what’s inside your LED light kit. Most kits include LED strips, a power supply, connectors, and sometimes a remote control. Each component plays a vital role, so familiarize yourself with them. When I first started, I was surprised at how intuitive the setup can be once you know what each piece does.
Gathering Your Tools
You’ll need a few basic tools: wire cutters, a screwdriver, and possibly some electrical tape. These tools will help you cut, secure, and tidy up your connections. If you’re like me, you might find satisfaction in having everything you need within arm’s reach.
Identifying Positive And Negative Wires
LEDs run on DC power, which means polarity matters. Identify the positive and negative wires from your power source and LED strip. This is crucial, as reversing them can prevent the lights from working or even cause damage. A mistake I learned from early on was neglecting this step, which led to a lot of unnecessary troubleshooting.
Connecting The Led Strips
Align the connectors with the LED strip, ensuring that positive matches positive and negative matches negative. Firmly press the connectors together. If you’re using multiple strips, connect them end-to-end using the provided connectors. Ensure each connection is secure to avoid flickering or loss of power.
Securing The Power Supply
Connect the other end of your LED strip to the power supply. Make sure the connection is tight to avoid any power interruptions. Secure the power supply in a safe location, away from moisture and excessive heat. This step provides reliability and longevity to your setup.
Testing Your Setup
Before securing everything in place, plug in your setup and test it. Turn the lights on and off, and check for any flickering. If everything looks good, you can proceed with attaching the LED strips to your desired surface. Testing is a confidence booster; it reassures you that your efforts were successful.
Final Thoughts
Once your LEDs are glowing brightly, stand back and enjoy your handiwork. Wiring LED lights doesn’t have to be complicated. With a bit of patience and attention to detail, you can achieve professional-looking results. Are there any other projects you’ve been hesitant to try? Maybe this success will inspire you to tackle those next!
Testing And Securing The Setup
Testing and securing your LED light setup is crucial. It ensures functionality and longevity. A reliable setup enhances safety. Follow these steps to test and secure your lights.
Testing The Led Lights
Connect the LED lights to a power source. Turn the power on. Check each light for brightness and flickering. Each light should shine evenly. Replace any faulty lights immediately.
Use a multimeter to test voltage. Ensure the voltage matches the LED specifications. Incorrect voltage can damage your lights.
Checking Connections
Inspect all connections. Ensure wires are secure and well-insulated. Loose connections can cause shorts. Shorts can damage your setup.
Use connectors designed for LED lights. They ensure a tight fit. Avoid using tape for permanent connections.
Securing The Setup
Mount the LED lights securely. Use clips or brackets. They prevent sagging and displacement. Ensure all wires are neatly organized.
Keep wires away from heat sources. Heat can damage insulation. It can also cause fires.
Final Inspection
Conduct a final inspection of the setup. Look for any visible issues. Check for signs of wear or damage.
Turn the lights on again. Ensure all lights work as expected. Enjoy your well-lit space!

Credit: diy.stackexchange.com
Frequently Asked Questions
How To Connect Led Lights To A Power Source?
First, identify the positive and negative wires. Connect them to the power source terminals. Ensure connections are secure.
Do Led Lights Need A Special Switch?
LED lights work with regular switches. But, dimmable LED lights need a compatible dimmer switch for proper function.
What Tools Are Required To Wire Led Lights?
You need wire cutters, strippers, and connectors. A screwdriver and electrical tape are also helpful for secure installation.
Conclusion
Wiring LED lights can be simple with the right steps. Follow instructions carefully. Ensure connections are secure. Choose the correct power source. Test your setup for safety. LED lights are energy-efficient. They enhance home and garden spaces. Brighten rooms with less power.
Enjoy the beauty and savings LED lights offer. Try different colors and designs. Experiment with placement for best effect. With patience, your lighting project will succeed. Remember to check local regulations. Happy lighting!
Related Article
- Led Lights Disadvantages: Unseen Drawbacks Revealed
- Facial Led Light Therapy: Illuminate Your Skin’s Beauty
- 12 Modern Basement LED Lighting Ideas for a Bright and Functional Space