How to Install Bathroom Light Fixture Junction Box? Step-by-Step Guide
How to install bathroom light fixture junction box? Turn off power at the breaker. Remove the old fixture and disconnect wires. Mount the junction box to the wall stud or ceiling joist. Feed electrical wires through the box. Secure the box with screws. Connect wires (black to black, white to white, ground to ground), then install the fixture.
Imagine effortlessly illuminating your bathroom with the perfect glow every time you flick the switch. It’s easier than you might think, and this guide will walk you through each step with clear instructions. You’ll gain the confidence to tackle this project yourself, saving money and achieving the professional finish you desire.
Ready to master the art of installing a junction box like a pro? Let’s dive in and make your bathroom lighting dreams a reality!
How to Install Bathroom Light Fixture Junction Box?
Tools And Materials Needed
Installing a bathroom light fixture junction box requires the right tools and materials. Having everything ready makes the process smooth. It ensures that installation is efficient and safe. Let’s explore what you need for this task.
Tools Required
Before starting, gather essential tools. A screwdriver is crucial for fastening screws. You’ll need a drill to make holes in the wall. A utility knife will help cut through drywall. Having wire cutters is important for trimming wires. A voltage tester ensures safety by checking live wires. Pliers help in bending and twisting wires.
Materials Needed
Materials are equally important for installation. Get a junction box suitable for bathroom fixtures. You’ll need screws to secure the box in place. Ensure you have electrical wire that matches your fixture. Wire nuts are essential for connecting and securing wires. Electrical tape is crucial for insulating wire connections. Drywall anchors are needed if you’re mounting on drywall.
Safety Equipment
Safety gear is important to protect yourself. Wear safety goggles to shield eyes from debris. Use gloves to protect hands during work. Consider wearing a dust mask if cutting drywall. Always have a flashlight for better visibility. Ensure the area is well-ventilated while working.
Safety Precautions
Ensure safety by turning off the power supply at the circuit breaker before installation. Use insulated tools to avoid electrical shocks. Confirm proper wiring by consulting the manufacturer’s manual for guidance.
Installing a bathroom light fixture junction box can be a rewarding DIY project. However, safety is crucial to ensure the job is done right without any mishaps. Before diving into the installation process, let’s talk about some important safety precautions you need to take. These precautions not only protect you but also ensure the longevity and efficiency of your electrical work.
Turn Off The Power
Always start by turning off the power at the circuit breaker. You might think flipping the switch off is enough, but it isn’t. The breaker ensures that no electricity flows to the area you’re working on. Use a voltage tester to double-check that the power is off. It might seem like an extra step, but it’s a vital one.
Wear Protective Gear
Wearing protective gear is not just for professionals. You should wear safety goggles to protect your eyes from debris and gloves to protect your hands from sharp edges. Remember, your safety is paramount, so don’t skimp on protective gear.
Check For Hidden Dangers
Before you start drilling, inspect the area for any hidden pipes or wires. You don’t want to accidentally damage something that could lead to costly repairs. Use a stud finder or wiring detector to ensure the coast is clear.
Work With A Partner
Having someone with you can be incredibly beneficial. They can hold the ladder steady or pass you tools. More importantly, if something goes wrong, you have immediate assistance. It’s always better to have an extra pair of hands and eyes during such tasks.
Keep Tools Organized
Scattered tools can lead to accidents. Keep your workspace tidy by organizing your tools and materials. This not only prevents trips and falls but also makes your work more efficient. Having a designated place for each tool minimizes the risk of misplacing something important.
Read Instructions Thoroughly
Before you begin, read the manufacturer’s instructions carefully. Each junction box and fixture can have unique requirements. Don’t rush through this step. Understanding the specifics will save you from potential mistakes and ensure your installation meets safety standards.
Test Your Work
After installation, test the fixture to ensure everything is working correctly. Use the voltage tester again to ensure there are no live wires. This step confirms that your work is secure and safe. If something seems off, take the time to fix it before wrapping up. Safety precautions are the backbone of any successful DIY project. By taking these steps, you not only protect yourself but also ensure your bathroom light fixture is installed safely and efficiently. Have you ever overlooked a safety measure and regretted it? Share your experiences or thoughts in the comments below.
Preparing The Installation Area
Preparing the installation area is the first step in installing a bathroom light fixture junction box. Clear the workspace and ensure safety by shutting off the electricity. Make sure the tools and materials are within reach.
Preparing the installation area for your bathroom light fixture junction box is crucial to ensure a smooth and safe installation process. Imagine the satisfaction of seeing your bathroom transform with the perfect lighting. But before you get to the fun part, setting the groundwork is essential. A well-prepared area not only makes the installation easier but also prevents future complications.
Understanding Your Space
Begin by assessing your bathroom’s layout. Where is the optimal spot for your light fixture? Consider areas that need more illumination. Think about the functionality and aesthetics of the placement. This decision can make or break your bathroom’s ambiance.
Gathering Necessary Tools
Having the right tools at hand is a game-changer. You’ll need a screwdriver, drill, and voltage tester, among other items. Double-check your toolbox. Missing tools can lead to frustration and delays. Preparation is half the battle.
Ensuring Safety First
Safety should always be your priority. Turn off electricity to the bathroom at the main circuit breaker. Use a voltage tester to confirm there’s no power. A small oversight can lead to big accidents. Protect yourself and your home.
Cleaning The Installation Area
A clean surface is essential. Dust and debris can interfere with the installation. Wipe down the area where the junction box will be installed. A spotless area ensures the box fits securely.
Marking The Spot
Precision is key. Use a pencil to mark where the junction box will be placed. Measure carefully to avoid crooked installation. A well-marked spot guides you through the process seamlessly.
Checking Wall Stability
Make sure your wall can support the junction box. Press and tap lightly to ensure it’s stable. Weak spots may require reinforcement. A sturdy wall guarantees your light fixture stays put.
Personal Insight: Embrace The Process
When I first installed a junction box, I underestimated the importance of preparation. Rushing led to missteps and extra work. Take the time to prepare thoroughly. It makes the actual installation enjoyable and rewarding. Can you imagine the satisfaction of flipping the switch and seeing your bathroom bathed in perfect light? Preparing the installation area is a pivotal step towards that vision. What would you do differently in your next project?
Credit: www.hunterfan.com
Mounting The Junction Box
Mounting the junction box is a crucial step in installing a bathroom light fixture. A secure mount ensures the light functions safely and effectively. This step requires careful attention to detail. Follow these simple steps to mount the junction box correctly.
Step 1: Choose The Right Spot
Identify the ideal location on the wall. Ensure it’s close to the electrical source. The spot should support the weight of the fixture.
Step 2: Mark The Position
Use a pencil to mark the drill spots on the wall. This helps in precise placement. Align the box with these marks.
Step 3: Drill Holes
Drill holes into the marked spots. Use a drill bit that matches the screws’ size. Ensure holes are not too big.
Step 4: Secure The Box
Insert screws through the junction box holes. Tighten them into the drilled holes. Ensure the box is firmly attached.
Step 5: Test Stability
Gently pull the box to check its stability. It should not wobble or move. A stable box ensures a safe fixture installation.
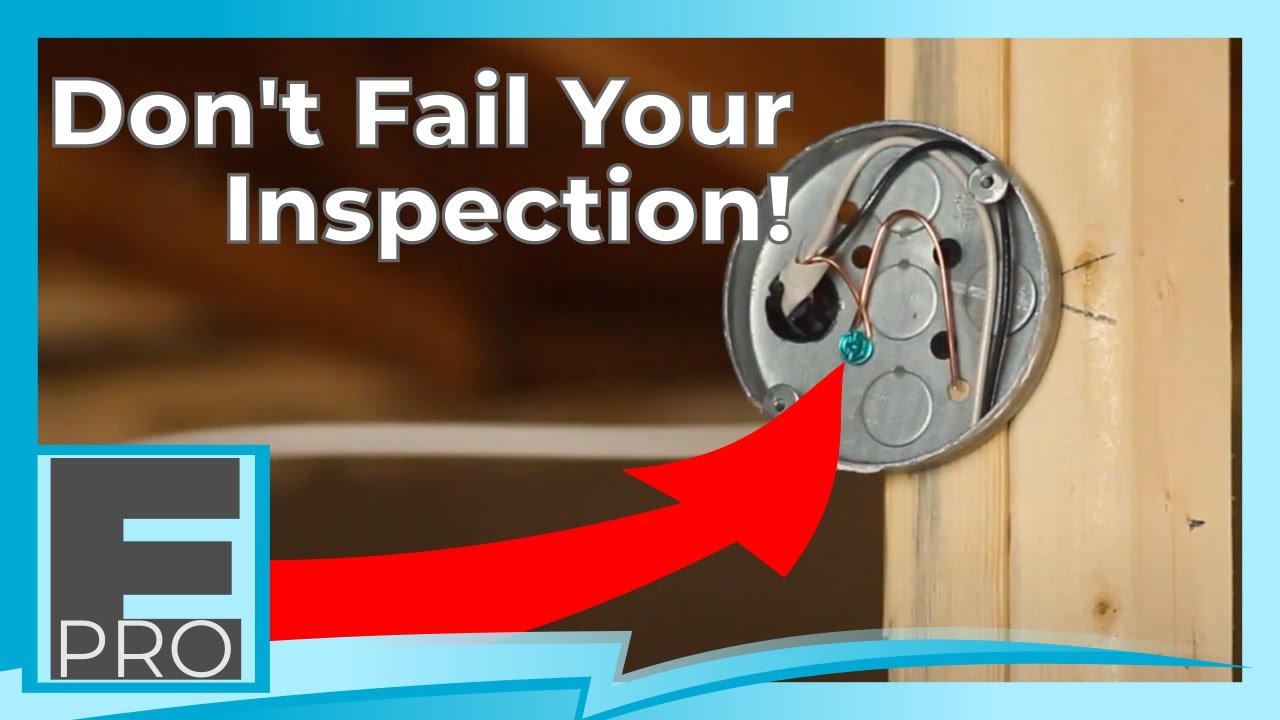
Step 6: Connect Wires
Once secure, you can connect the electrical wires. Follow safety guidelines while doing this. This step prepares the box for the fixture.
Wiring And Securing The Fixture
Installing a bathroom light fixture requires careful wiring and secure mounting. This ensures safety and functionality. Let’s explore the steps to wire and secure your new light fixture.
Connecting The Wires
First, turn off the power at the circuit breaker. This prevents any electrical mishaps. Use a voltage tester to ensure no electricity flows.
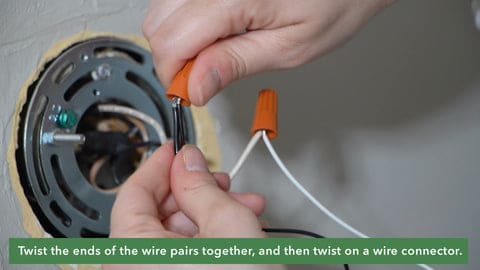
Next, match the wires from the fixture to those in the junction box. Usually, black to black, white to white, and green or copper to the ground. Twist the wires together and secure them with wire connectors.
Attaching The Fixture
After wiring, attach the fixture to the junction box. Align the fixture’s mounting bracket with the box’s screw holes. Use the provided screws to secure it in place.
Ensure the fixture is level and sits flush against the wall. This prevents light from escaping and maintains a clean look.
Securing And Testing
Tighten all screws to ensure the fixture is stable. Loose fixtures may wobble or fall over time.
Restore power at the breaker. Turn on the light switch to test the fixture. If it lights up, the installation is successful.

Credit: diy.stackexchange.com

Credit: www.youtube.com
Frequently Asked Questions
What Tools Are Needed To Install A Junction Box?
You will need a screwdriver, wire stripper, and a drill. Ensure safety by wearing gloves and goggles.
How Do You Secure The Junction Box To The Wall?
Align the box with the wall stud. Use screws to fasten it securely. Ensure it is level.
Can You Install A Junction Box Without An Electrician?
Yes, with basic knowledge and tools. Follow instructions carefully. Turn off power first for safety.
Conclusion
Installing a bathroom light fixture junction box is straightforward. Start by gathering all necessary tools. Follow the steps carefully to ensure safety. Double-check your wiring connections. Always turn off the electricity before starting. Seek help if unsure about any step.
Proper installation ensures long-lasting performance. Enjoy your well-lit bathroom space. Remember, patience and precision are key. Take your time with each step. Celebrate your successful DIY project. A well-installed junction box brings peace of mind. Your bathroom will shine bright.
Related Article