How to Wire a Bathroom Fan And Light Diagram? Expert Tips
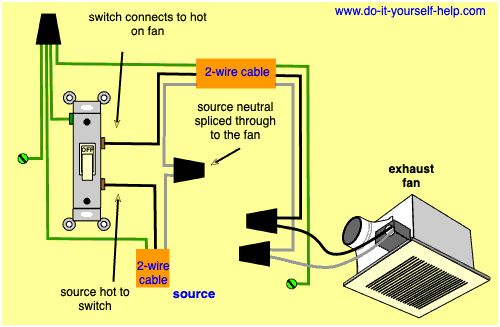
How to wire a bathroom fan and light diagram? To wire a bathroom fan and light, run power to a double switch box. Connect the black wire from power to both switch terminals. From each switch, run separate black wires—one to the fan, one to the light. Connect all white (neutral) wires together and all ground wires together.
Many homeowners find themselves staring at a jumble of wires, unsure of where to start. But fear not! Understanding how to wire a bathroom fan and light is easier than you might think, and we’re here to guide you every step of the way.
Imagine stepping into a bathroom where the fan quietly whisks away moisture, preventing mold, while the lighting perfectly complements your space. Sounds perfect, right? By following a clear and simple wiring diagram, you can achieve this effortlessly. This guide will break down the process into manageable steps, ensuring you have all the tools and knowledge at your fingertips. Curious about transforming your bathroom experience? Keep reading, and discover how you can easily tackle this project with confidence, even if you’ve never touched a wire before. Let’s turn that daunting task into an achievable DIY triumph!
How to Wire a Bathroom Fan And Light Diagram?
Essential Tools And Materials
Wiring a bathroom fan and light might seem daunting, but with the right tools and materials, you can tackle this project like a pro. Knowing what you need ahead of time saves you from those frustrating mid-project trips to the store. Plus, having everything on hand makes the process smoother and more efficient. Let’s dive into the essentials that will help you successfully wire your bathroom fan and light.
Essential Tools
Having the right tools at your disposal is crucial for any wiring project. First, you’ll need a voltage tester to ensure safety by checking that the power is off before you start. A wire stripper is another must-have; it allows you to easily remove the insulation from the wires without damaging them.
A screwdriver set is essential for connecting wires to the fan and light fixtures. Consider a multi-bit screwdriver to save space and time. Don’t forget pliers, especially needle-nose pliers, for manipulating wires and making precise adjustments.
Lastly, a tape measure will come in handy to ensure wires are cut to the correct lengths and everything is positioned correctly. With these tools, you’ll be well-prepared to tackle the wiring with confidence.
Materials Needed
Now, let’s talk about materials. You’ll need electrical cables that match the amperage of your circuit. These cables usually come in rolls, so make sure you have enough for your bathroom layout. Wire connectors are essential for securing your connections and preventing electrical hazards.
Of course, you’ll need the fan and light fixtures themselves. Choose ones that fit your bathroom’s style and meet your ventilation needs. Additionally, have some electrical tape on hand to secure wire connections and provide extra safety.
You’ll also need an electrical box to house the connections securely. Pick a box that is appropriate for your wall type. By gathering these materials, you’re setting yourself up for a successful wiring project.
Safety Gear
Safety should always be your top priority. Equip yourself with safety glasses to protect your eyes from debris. A pair of gloves will safeguard your hands from sharp edges and potential electrical shocks.
Consider wearing a dust mask if you’re working in a confined space with little ventilation. It’s easy to overlook safety, but these small precautions can prevent serious injuries and make your project more enjoyable.
Thoughts To Ponder
Are there items in your toolbox that you haven’t used in a while? This project could be the perfect opportunity to dust them off. As you prepare, think about your bathroom’s layout and the placement of your fan and light. Could rearranging the layout make your bathroom more functional?
As you gather your tools and materials, reflect on your past DIY experiences. What went well, and what could be improved? These insights will guide you in planning an efficient and successful wiring project.

Credit: www.pinterest.com
Safety Precautions
Ensure safety by turning off power at the circuit breaker before starting. Use insulated tools to prevent electrical shock. Double-check connections against the wiring diagram to avoid mistakes.
Installing a bathroom fan and light can transform your space, enhancing air circulation and lighting. However, before you dive into wiring, safety should be your priority. Understanding safety precautions is crucial to avoid electrical hazards and ensure a successful installation.
Turn Off The Power
Before starting any electrical work, always turn off the power at the circuit breaker. This step is non-negotiable. Working with live wires can result in serious injuries. Use a circuit tester to confirm the power is off.
Use Proper Tools
Ensure you have the right tools for the job. A screwdriver, wire stripper, and voltage tester are essential. Avoid makeshift tools, as they can damage wires or cause accidents. Quality tools can make the task easier and safer.
Inspect Wiring
Examine existing wiring for signs of wear or damage. Frayed wires can lead to electrical shorts or fires. If you find damaged wiring, consider replacing it. New wiring ensures a safe connection for your fan and light.
Follow Manufacturer Instructions
Each fan and light model comes with specific instructions. Read them carefully and follow each step. Ignoring these details can lead to improper installation. Proper adherence ensures the system works efficiently and safely.
Secure Connections
Ensure all wire connections are tight and secure. Loose connections can cause overheating or electrical failure. Use wire nuts to cover exposed wire ends. This simple step can prevent accidents and ensure longevity.
Ground The System
Grounding is vital for electrical safety. Connect the grounding wire to the appropriate terminal. This protects against electrical shocks and system malfunctions. Grounding provides peace of mind that your installation is secure.
Seek Professional Help When Needed
If you feel unsure about any step, consider hiring a professional electrician. They have the expertise to handle complex wiring. It’s better to invest in professional help than risk your safety. Have you ever tackled a DIY project that seemed daunting at first? Wiring a bathroom fan and light requires precision and care. With these safety precautions, you can approach the task with confidence. Are you ready to elevate your bathroom safely?
Preparing The Wiring Layout
Organizing the wiring layout is crucial for installing a bathroom fan and light. Begin by marking the fan and light locations on the wall. Then, connect the wires to the correct switches and outlets, ensuring a safe and efficient setup.
Preparing the wiring layout for a bathroom fan and light can seem daunting at first, but with a bit of planning, it becomes a manageable task. Imagine walking into your bathroom and having the perfect balance of light and ventilation—a result of your thoughtful wiring layout. As you prepare, remember that clarity and safety are your top priorities.
Understanding The Wiring Diagram
Before you start, familiarize yourself with the wiring diagram. This diagram is your roadmap; it shows how each component connects. Spend some time reviewing it thoroughly. Do you see how the wires link the fan and light to the power source? Understanding this will prevent mistakes later.
Gathering Essential Tools And Materials
Ensure you have all the necessary tools: wire cutters, screwdrivers, and a voltage tester. These tools are essential for a smooth wiring process. Missing a tool can halt your progress and lead to frustration. Double-check your toolbox before starting.
Mapping Out The Circuit
Sketch out the circuit on paper. This visual guide helps you see where each wire will run. It’s like creating a map before a journey. Think about the placement: where will the fan and light be installed? This affects how you’ll run the wires.
Determining Wire Routes
Decide on the best paths for the wires. Keep them away from water sources to ensure safety. This step is crucial in preventing electrical hazards. Are there obstacles in your path? Plan how to navigate around them without compromising safety.
Labeling Wires For Easy Identification
Label each wire clearly. This saves time and confusion during installation. Imagine trying to fix a problem and not knowing which wire is which. A simple label can save you hours of troubleshooting later. Will you remember what each wire connects to without labels?
Considering Electrical Load
Calculate the electrical load. Ensure your wiring can handle the fan and light without overloading. This prevents circuit breakers from tripping. Is your current setup capable of supporting this new addition? Assess this to avoid future electrical issues.
Consulting Local Building Codes
Check local building codes before proceeding. They ensure your wiring meets safety standards. Ignoring them could lead to costly penalties. Are you familiar with the regulations in your area? It’s worth double-checking to ensure compliance. Preparing the wiring layout thoughtfully lays the groundwork for a successful installation. As you plan, consider the specifics of your bathroom space and needs. Remember, the effort you put into preparation will pay off in ease and efficiency later.
Connecting The Fan And Light
Discover the simple steps to wire a bathroom fan and light correctly. Follow a clear diagram to connect wires safely. Enhance your bathroom experience with proper lighting and ventilation.
Connecting a bathroom fan and light may seem daunting, but it’s a task you can tackle with a little patience and the right guidance. Imagine the satisfaction of flipping a switch and knowing that you wired it yourself. With a few tools and a basic understanding of electrical wiring, you can connect your fan and light safely and efficiently. Let’s dive into the steps to make this possible, ensuring you have a functional and well-ventilated bathroom.
Understanding The Wiring Diagram
Begin by familiarizing yourself with the wiring diagram. This is your roadmap to success. Study it carefully to understand how the fan and light are connected to the power source. Typically, the diagram will show connections for each component, including wires for power, neutral, and ground. If you’re unsure, take a moment to sketch it out. Visual aids can make the task less intimidating.
Gathering The Necessary Tools And Materials
Before starting, ensure you have the right tools and materials. You’ll need a screwdriver, wire strippers, wire nuts, and electrical tape. Make sure you have the correct gauge wire as specified in your diagram. Having everything ready will save you time and prevent unnecessary trips to the hardware store. Plus, working with the right tools makes the process smoother and safer.
Switching Off The Power
Always start by turning off the power at the circuit breaker. This is crucial for your safety. Double-check that the power is off by using a voltage tester on the wires. Never assume it’s off; safety first! This step is non-negotiable and ensures you avoid any electrical shocks.
Connecting The Wires
With the power off, start connecting the wires according to the diagram. Typically, you’ll connect the black (hot) wire from the power source to the switch and then to the fan and light. The white (neutral) wires should be connected together, as should the ground wires. Use wire nuts to secure the connections. Make sure each connection is tight to prevent future electrical issues.
Testing Your Connections
Once all connections are made, restore power at the circuit breaker. Test the switch to ensure the fan and light operate as expected. If they don’t, double-check your connections against the diagram. It’s a moment of truth that can be quite rewarding. If everything works, you’ve successfully wired your bathroom fan and light!
Troubleshooting Common Issues
If you encounter issues, don’t panic. Check if the circuit breaker is tripped or if the connections are loose. Sometimes, a small oversight like a loose wire can cause problems. Revisit each step methodically. Remember, patience is key. Solving these issues is part of the learning process. Are you ready to tackle this project? Imagine the convenience and satisfaction of a job well done. With these steps, you can confidently wire your bathroom fan and light, adding value and comfort to your home.
Testing And Troubleshooting
Testing and troubleshooting ensure the proper functioning of your bathroom fan and light. After wiring, it’s essential to verify everything works correctly. This step can prevent future issues and enhance safety. An effective test confirms that your wiring diagram was followed accurately. If problems arise, troubleshooting helps identify and fix them. This process involves checking connections and ensuring all components operate as expected. Let’s dive into the testing and troubleshooting process.
Testing The Bathroom Fan And Light
Begin by turning on the power supply to the bathroom circuit. Flip the switch to test the fan and light. They should both operate without issues. Listen for unusual noises from the fan. Check if the light flickers or remains stable. These signs indicate good wiring. If something seems off, further checks are needed.
Using A Voltage Tester
A voltage tester is a handy tool. It confirms power flow in wires. Test each wire in the circuit. A reading indicates correct power flow. No reading suggests a connection issue. Double-check all wire connections. Make sure they are secure and properly insulated. This tool helps pinpoint where problems might exist.
Troubleshooting Common Issues
Common issues include non-working fans or lights. Check the switch first. Ensure it is not faulty. Inspect connections at the junction box. Loose wires can cause malfunctions. Verify that all wire nuts are tight. Consider checking the circuit breaker. It might have tripped during installation.
Inspecting The Wiring Diagram
Revisit the wiring diagram. Confirm all connections match the diagram. Ensure the correct wires are joined. This review helps catch any overlooked errors. Mistakes in wiring can lead to device failure. A quick comparison can save time and effort. Make adjustments as necessary.
Seeking Professional Help
If issues persist, consult a professional. An electrician can provide expert assistance. They ensure safety and proper functionality. Complex problems may require their skills. Don’t hesitate to reach out if needed. Safety should always be a priority.
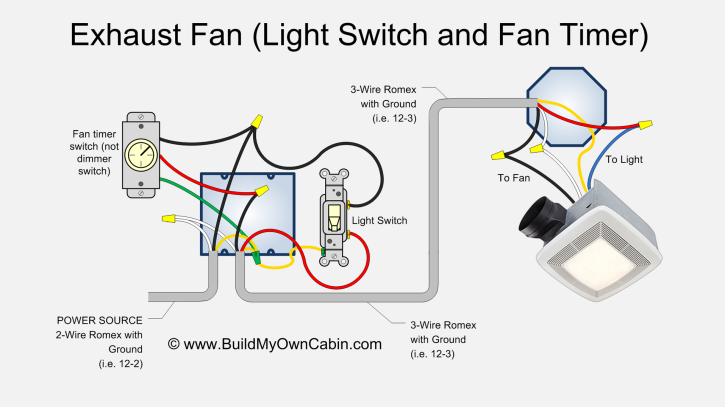
Credit: www.buildmyowncabin.com
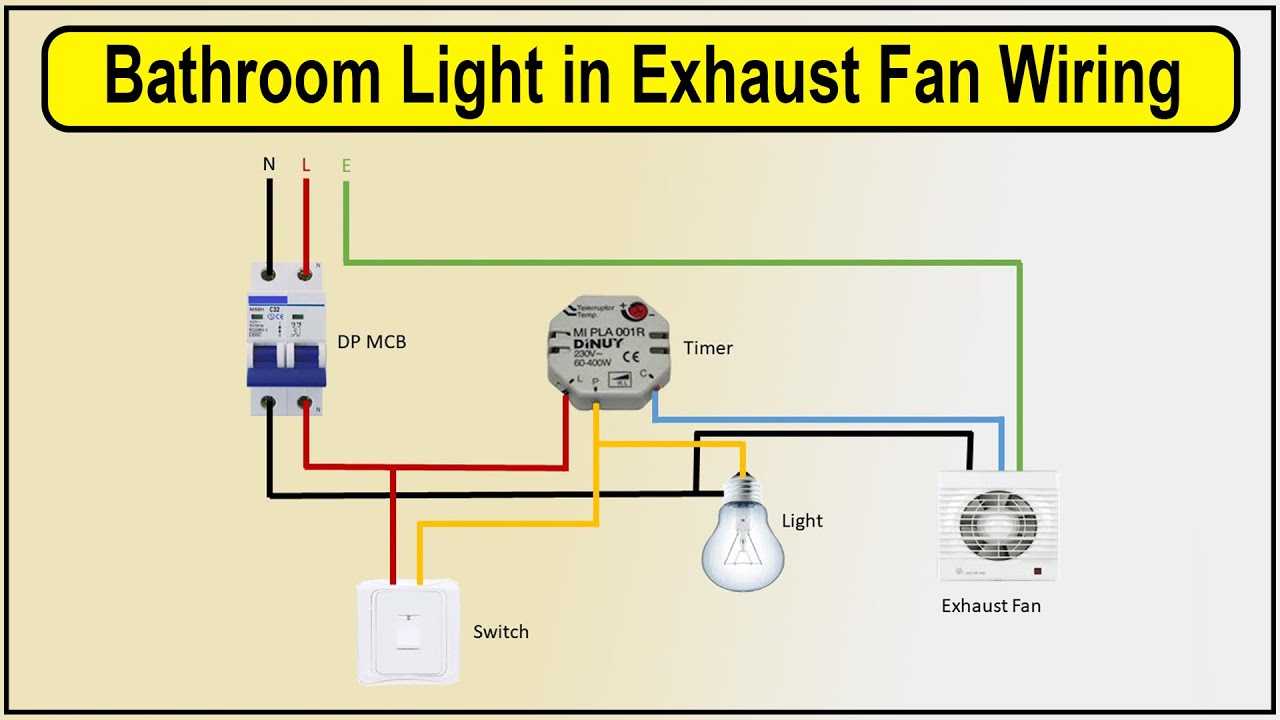
Credit: www.youtube.com
Frequently Asked Questions
How Do You Wire A Bathroom Fan And Light Together?
Wiring them together involves connecting both to the same power source. Use a switch to control both.
Can I Install A Fan Without An Electrician?
Yes, if you have basic wiring knowledge. Follow safety guidelines and local electrical codes.
What Tools Are Needed For Wiring A Fan And Light?
You need a screwdriver, wire stripper, and voltage tester. These tools help ensure safe and accurate installation.
Conclusion
Wiring a bathroom fan and light can seem tricky. But it’s manageable with the right guidance. Remember to always prioritize safety. Turn off the power before starting. Follow the diagram carefully. Use quality tools and materials. Double-check connections to avoid issues later.
Practice patience. It ensures a proper setup. Seek help if you’re unsure about any step. This ensures everything works smoothly. Proper installation enhances bathroom comfort and efficiency. Enjoy a well-ventilated and bright space. Your efforts will pay off with a functional and safe bathroom.
Related Article