How to Wire a Room With Lights And Outlets Efficiently
How to wire a room with lights and outlets? To wire a room, run electrical cable from the main panel to a switch box, then to light fixtures. For outlets, run cable from the panel or lights to each outlet location. Use 12 or 14-gauge wire, follow code for spacing and grounding, and install proper breakers. Always turn off power.
Imagine transforming a dim, inconvenient space into a bright, functional area that meets all your needs. The good news is, with the right guidance, you can wire a room with lights and outlets to create a space that feels just right.
By learning how to wire a room properly, you not only enhance the aesthetic appeal but also improve the functionality and safety of your home. Wiring may seem daunting at first, but once you understand the basics, you’ll be surprised at how manageable it can be. This article will guide you step-by-step through the process, ensuring you have the confidence to tackle this project yourself. So, are you ready to shed light on your wiring skills and power up your room? Let’s dive in!

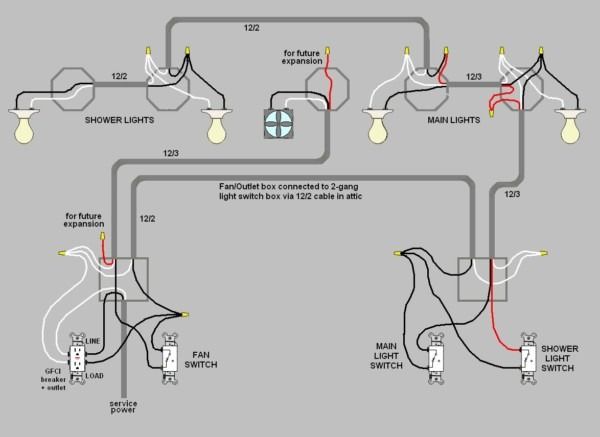
Credit: www.pinterest.com
How to Wire a Room With Lights And Outlets?
Planning The Layout
Planning the layout is crucial for wiring a room with lights and outlets. A well-thought-out plan ensures safety and efficiency. It helps avoid costly mistakes and ensures proper functionality.
Start by assessing the room’s purpose and usage. Consider where you need light and power. List the appliances and devices you will use. This will guide your outlet and lighting placement.
Read More: How to Add Light to a Dark Room? Brighten Up Fast!
Understand The Room’s Function
Determine how you will use the room. A kitchen needs more outlets. A living room may need focused lighting. This understanding shapes your wiring plan.
Consider The Lighting Needs
Identify areas needing more light. Task lighting is vital for workspaces. Ambient lighting creates a relaxed atmosphere. Highlight these areas in your plan.
Map Out The Electrical Outlets
Decide where outlets are necessary. Place them near frequently used devices. Ensure they are accessible and convenient. This prevents the need for extension cords.
Plan For Future Additions
Consider potential future needs. A growing family might need more outlets. Plan for additional lighting or devices. This saves time and effort later.
Ensure Safety Compliance
Follow local electrical codes and standards. This ensures safety and legality. Consult a professional if unsure. Safety should always be a priority.
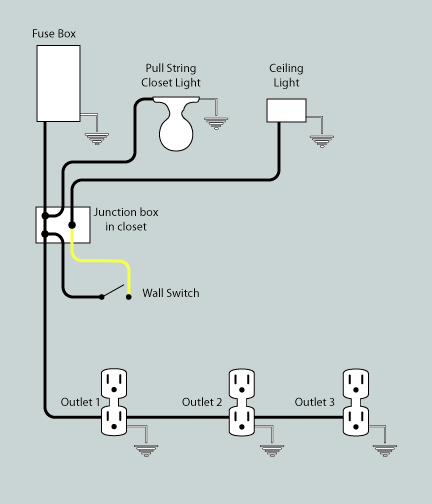
Credit: www.remodernranch.com
Choosing The Right Materials
Choosing the right materials is key when wiring a room. Quality materials ensure safety and efficiency. This guide focuses on selecting the best materials for your project. With the right supplies, your electrical setup will function properly.
Read More: Where to Place Pot Lights in Living Room? Expert Tips
Understanding Electrical Wires
Electrical wires carry power to lights and outlets. Copper wires are common due to their conductivity. Aluminum wires are cheaper but less efficient. Choose wires based on your budget and needs.
Picking The Right Outlets
Outlets are vital for connecting devices. Standard outlets suit most rooms. Ground Fault Circuit Interrupters (GFCIs) are ideal for kitchens and bathrooms. GFCIs prevent electrical shocks in wet areas.
Selecting Suitable Light Fixtures
Light fixtures add style and function. LED fixtures are energy-efficient and long-lasting. Choose fixtures that match your room’s decor. Ensure they fit your space and provide enough light.
Choosing Quality Switches
Switches control power flow to lights. Standard toggle switches are simple and reliable. Dimmer switches offer adjustable lighting. Choose switches that fit your room’s style and needs.
Investing In Durable Junction Boxes
Junction boxes protect electrical connections. Metal boxes are sturdy and fire-resistant. Plastic boxes are lightweight and easy to install. Select boxes based on location and safety requirements.
Using Reliable Circuit Breakers
Circuit breakers prevent electrical overloads. Choose breakers that match your home’s power needs. Ensure they are compatible with your wiring system. Quality breakers enhance safety and efficiency.
Installing The Wiring
Installing the wiring in a room is a crucial task. It requires attention to detail and safety. Proper wiring ensures your lights and outlets work efficiently. It can also prevent electrical hazards. Let’s explore the steps involved in installing wiring for lights and outlets.
Preparing The Room For Wiring
Start by turning off the main power supply. This step is vital to ensure safety. Use a voltage tester to confirm the power is off. Then, plan the layout for your wires. Decide where lights and outlets will be. Mark these spots on the walls.
Running The Wiring
Drill holes in the wall studs to run wires. Ensure the holes are smooth to avoid wire damage. Feed the wires through these holes. Keep them neat and organized. Secure the wires with cable clamps. This prevents them from sagging.
Connecting The Wires To Outlets
Connect the wires to the outlet terminals. Use a screwdriver for a tight connection. The black wire goes to the brass terminal. The white wire connects to the silver terminal. Attach the ground wire to the green terminal. Double-check each connection for security.
Connecting The Wires To Light Fixtures
Attach the wires to the light fixture terminals. Match the black wire to the black terminal. The white wire connects to the white terminal. Secure the ground wire to the metal fixture frame. Ensure all connections are tight and secure.
Testing The Wiring
Once connected, turn on the power supply. Test each outlet and light fixture. Use a circuit tester for accuracy. Ensure everything works as expected. If an issue arises, turn off the power immediately. Recheck your connections carefully.
Testing And Troubleshooting
Testing and troubleshooting are crucial steps in wiring a room with lights and outlets. Ensuring everything works properly prevents future issues. This phase helps identify any mistakes made during installation. It provides peace of mind knowing your electrical system is safe and efficient.
Testing The Electrical Connections
Check each connection with a multimeter. Verify voltage consistency. Ensure wires are properly attached. Loose connections can cause problems. Look for continuity in the circuit. This confirms the circuit is complete. Test outlets and switches individually. Ensure they function correctly.
Inspecting For Faulty Wiring
Examine wiring for damage. Check insulation and wire integrity. Damaged wires can be dangerous. Replace any frayed or exposed wires. Inspect for proper grounding. Grounding prevents electrical shocks. Make sure all wires are securely fastened.
Identifying Common Problems
Look for frequent issues like flickering lights. This might indicate a loose connection. Test outlets for power consistency. Intermittent power signals faulty wiring. Address tripped circuit breakers. They may suggest overloads or short circuits.
Solving Issues Efficiently
Fix loose connections promptly. Use a screwdriver to tighten screws. Replace faulty outlets and switches. Ensure proper wiring techniques. Use wire nuts for secure connections. Retest after making repairs. Confirm the system works perfectly.
Frequently Asked Questions
How To Wire Outlets And Lights On The Same Circuit?
Turn off power at the breaker. Connect black wires to brass screws, white wires to silver screws. Ground wires attach to green screws. Use wire nuts to secure connections. Ensure all connections are tight. Restore power and test. Follow local electrical codes and consult a professional if unsure.
What Are The Three Basic Rules Of Wiring?
The three basic rules of wiring are: ensure all connections are secure, use the correct wire gauge for the circuit, and follow color coding standards for safety and consistency. Always prioritize safety and adhere to local electrical codes.
Does Code Allow Lights And Outlets On The Same Circuit?
Yes, code generally allows lights and outlets on the same circuit. Ensure the circuit load doesn’t exceed 80% of the circuit breaker’s rating. It’s recommended to consult local electrical codes and a qualified electrician for specific guidelines and safety requirements.
Conclusion
Wiring a room with lights and outlets requires patience and care. Start by planning your layout carefully. Gather the necessary tools and materials beforehand. Ensure safety by turning off the power supply. Follow each step methodically for success. Seek professional help if unsure at any stage.
Proper installation ensures efficient energy use. It also enhances the room’s functionality. Practice safe habits and double-check connections. Your efforts will pay off with reliable electrical work. Remember, a well-wired room creates a comfortable and convenient space. Happy wiring!